Wednesday 22 August 2012

I have been experimenting all day and have made good progress with fur. The fur is short enough that it looks like a birds hair but also dense enough that there are no patches

I have been creating a UV map in Photoshop, this UV is plugged into the Tip and Base colour and the opacity of each tweaked to produce the colour scheme needed through the hair. This is made simpler by creating a PSD network.

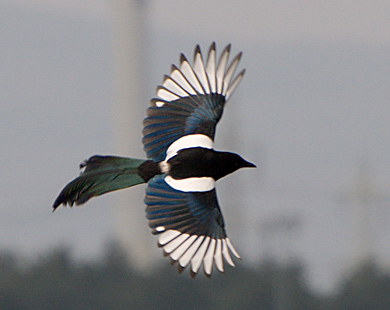
Here is a picture of the progress so far, there are a few glitches and it hasn't got the finished polish but it's started to take shape. I am happy with the fact it's starting to resemble a magpie now, from some angles with a grey lambert applied it was looking more and more like a dolphin.


Below is the texture map, it's a work in progress at the minute. All the different colour and parts of the body are on seperate layers so they can be easily tweaked, to see the results in Maya the file is saved in Photoshop and "update PSD network" is clicked within the UV editor to see the results.

The picture below shows a baldness map, this has been created as well as a hair length map to allow for a gradual fading of the hair as it approaches the beak, this was needed as it looked odd. The white parts of the map are equal to 1 and reveal hair, the black parts are equal to zero and hide the hair, the greys allow for partial baldness or length. I spent hours trying to get the maps to work, after much searching i eventually found the (simple) answer. Once the baldness map is created, the scene must be saved for the baldness map to be written to the project and be updated/edited. The only reason I needed access to the maps was so I had finer control over the paint attributes tool in Maya - I have found this to be a little awkward to use.


The next stage is to experiment with iridescent and specular to try to reproduce the glossy hair a magpie has. I won't have a chance to come back to this until Monday but I am hoping by this time next week i'll be rigging. The reason why am not to concerned about taking time on this model is because this will be duplicated, tweaked and used as the female bird so i don't mind taking my time to get it right.

Tuesday 21 August 2012

Trying to perfect fur

I have been experimenting with fur, I have chosen to use fur instead of individual feathers with fur applied as this looks to be a better match to a magpie. As predicted my UV's have had to be perfect in order to avoid patchy fur although i have spent a few hours with the following problem assuming it was down to my UV's when it wasn't.

The patchy fur on the above picture is not caused by the UV layout but instead caused by the "Roll" variable. Roll and Inclination allow the individual hairs to be uniformly rotated. Roll on the above fur was set to 1 and as a result the hairs around the neck had aligned themselves slightly inside the mesh.

After a bit of trial and error the fur above has been fixed.

I have used fur once before and encountered the same problem then as i do now; how to successfully eliminate fur from certain parts. In this case the legs and a partial part of the beak needed to be bald. Maya includes a feature where baldness can be "painted" on the various surfaces. The few times i have tried to paint baldness this way it has lead to frustration trying to remove specific hairs that will not paint out.

The second option is to create a map for the fur, the map is a gradient from white to black that allows you to gradient the length of the fur depending on the gradient. I have never used this method but it is likely I will experiment at some point as it seems to be the standard way of applying fur.

The method i have used is also common but maybe not quite as diverse; to replicate the part of the mesh i need fur on. Then apply the fur to the mesh, then hide the mesh. The result is the picture above, my main concern with this method is potential problem when applying a rig and animating. It's for this reason i'll look into creating a fur map.

As can be seen the seam of the UV on the wings needs to be applied more successfully. Obviously the colour is wrong but this experiment was only to see if a uniform fur could be applied over the bird. The next stage is to add a texture to the UV map in Photoshop and then plug this into the channel of the base and tip opacity on the fur, once this is done in theory the colour of the UV map should flow through the fur and it will have the colouring of a magpie.

Below are some experiments i wasn't happy with for various reasons.


Sunday 19 August 2012

UVing

I have just completed the UV'ing of the magpie.


The UV'ing was completed within Maya and took around 3 days. I found the texturing in Maya not very intuitive to begin with hence the slow progress. Although i have textured alot before i have never textured anything quite this complicated and done so to this standard.

The other reason this may have taken slightly longer is because I want to add a short layer of hair to the bird. I know from past experience that the UV map needs to be of a high quality for the hair to work. 

The wing and legs where UV'd seperately from the body and then lined up so they where a pretty good match.


Here is a before and after of the UV map, now the UV has been unwrapped from a seam the texture that goes onto the bird should be almost seamless. The seam has been put along the back of the bird, then as the seam gets to the tail it has been moved to underneath. When choosing a seam it should be put in a place that will have minimal exposure, I have chosen the back and the underneath of the tail. 

The next two stages are to add Hair (or maybe fur), paint baldness of the hair, colour the various parts and then play around with getting a convincing iridescence. After that the bird will be rigged and animated within a scene. 

Wednesday 8 August 2012

A picture of one of the older magpies i'd done. I didn't like this as the wings looked odd, they will be created extended, rigged and then i'll fold them back so maybe they'll always look odd. The birds body is still purposefully left simple until i decide whether i'll add detail in Maya or MudBox, although it will likely be in Mudbox.

And a picture of the latest bird, the progress on this birds body will go no further until i have finished modelling the wing. Currently the bird has a friendlier face, a beak that can open and close, a throat and tongue, claws on it's right foot and and improved body and tail compared to the previously posted model.


Hopefully the nest post will bring a bird that's fully modelled ready to add detail to, once the detail is added the bird will be fully rigged including wings then the scene the bird will live in will be modelled.

Reference images

Here are a few youtube videos of slow motion flight, although quite boring i have been studying these to work out how the wing opens and closes, and the actual movement of the wing during flight.


I just thought i'd make a contained post of the images i am constantly referencing when modelling the bird.


I haven't updated in a while as I have been struggling with two main things, feathers and wings!

The wing is the main thing I have had issues with, there was the option to have two models; one with wings opening and fully functional and one just with wings closed. I feel I have got to a certain point where I'm to close to go back now. The actual modelling of the magpie on the plus was a breeze.

Feather samples:


The feather on the left is a sculpted polygon feather with actual depth and extrusions, the feather on the right is a .PNG file with transparency added to a plane. There is little difference between the two visually, but i am thinking of adding nCloth to the feathers at a later date and the sculpted feather on the left will perform better as it has more geometry.

All feathers (sculpted & planes):
I have managed to find a website that actually documents the feathers of birds and have been able to photoshop the images so they have alpha backgrounds and improved contrast/brightness. These are actual magpie feathers with the correct amount of primary, secondary and tertiary feathers. The feathers that are sculpted have been UV'd using planar mapping which was straight forward. Each of the sculpted feathers have been adjusted to match the actual images i had, so the spines of the feathers and the shapes have all been individually tailored.

The final stage for the feathers is making a convincing bump map so the individual hairs coming from the spines look realistic. I have attempted this is Mudbox but i may be over thinking the process. creating some fine, closely bunched lines with some randomness will act pretty well when aligned with the flow of hairs on the feather and used as a bump map. So now the hurdle of creating a realistic feather, finding real feathers from a magpie and laying them out as a magpies wing looks (pictured below) the next big thing is producing a realistic wing and rigging it
Due to the amount of reference images, watching slow motion footage of birds flying and understanding the fact that a wing has a similar bone structure to a human arm i am confident with the rigging of the wing.