

Wednesday, 24 October 2012
Test Render #3
This is the shot that will be used when the magpie initially finds the ring. The shot is quite a still, dull shot so i added water that will flow.

Monday, 22 October 2012
Test Render #2
This is the wider, establishing shot that will be used initially. These shots are essentially being blocked out and will be linked up to produce the animation.


Sunday, 21 October 2012
Test Render #1
Quick update, the render below is a test render so i can see if everything will render okay. So far most of the scene renders well apart from a few things, the main thing being the magpies eyes. Due to the storyline needing them to be sparkly and reflective i'll redo these soon.
This scene is rendered bright and colourful and gives the impression of a sunny day. I will most likely render everything out in this style. Any colour correction changes to contribute to mood will be done in post as this will be much quicker and more flexible.
There is a single ambient light within the nest with an intensity of around 40, light linking has been used to only light up the inside of the nest. This allows for the bird to be seen, without the light the bird was more of a silhouette.

The tree used was from paint effects, this was converted from paint effects to polygons. The default texture assigned to the tree did not stand up to close ups and looks pixelated. As a result the tree was exported to mudbox, painted and reimported to Maya, this allowed for a bark texture with a slight bump map that stood up to close-up renders. In addition the leaves were changed as they also became pixelated.
The background image is a HDR image standing for High Dyanamic Range. These image have a curvature incorporated so they can be wrapped around a sphere and are typically made by photographing a reflective ball. The image was 170MB and is now 80MB, it not only gives a crisp image but also allows for lighting data to be calculated. By selected "Image Based Lighting" in Maya and plugging the HDR image in the lighting has become more realistic by mimicking the light source of the image.
This shot has been bookmarked and will be used as a benchmark when filming the external shots of the nest.
This scene is rendered bright and colourful and gives the impression of a sunny day. I will most likely render everything out in this style. Any colour correction changes to contribute to mood will be done in post as this will be much quicker and more flexible.
There is a single ambient light within the nest with an intensity of around 40, light linking has been used to only light up the inside of the nest. This allows for the bird to be seen, without the light the bird was more of a silhouette.

The background image is a HDR image standing for High Dyanamic Range. These image have a curvature incorporated so they can be wrapped around a sphere and are typically made by photographing a reflective ball. The image was 170MB and is now 80MB, it not only gives a crisp image but also allows for lighting data to be calculated. By selected "Image Based Lighting" in Maya and plugging the HDR image in the lighting has become more realistic by mimicking the light source of the image.
This shot has been bookmarked and will be used as a benchmark when filming the external shots of the nest.
Wednesday, 17 October 2012
Bird Nest/House Complete
The bird house modelling, UV'ing and texturing is now complete. This was an easy thing to model and UV overall, the roof of the bird house was the only time consuming thing to UV.
There are only 3 textures used on the bird house, the magpie has been placed in to check size and access.
The next stage is to look at the storyline, model a tree (although paint effects may be used for speed) and complete the scene. In the past I have set up a series of shots and saved them in different scene files. I will most likely do the same thing again, then each scne is animated, rendered then cut together in Premiere. This gives a little more flexibility, avoids waiting for one long render that may have a fault and makes the overall execution more manageable.
Here is the progress so far:
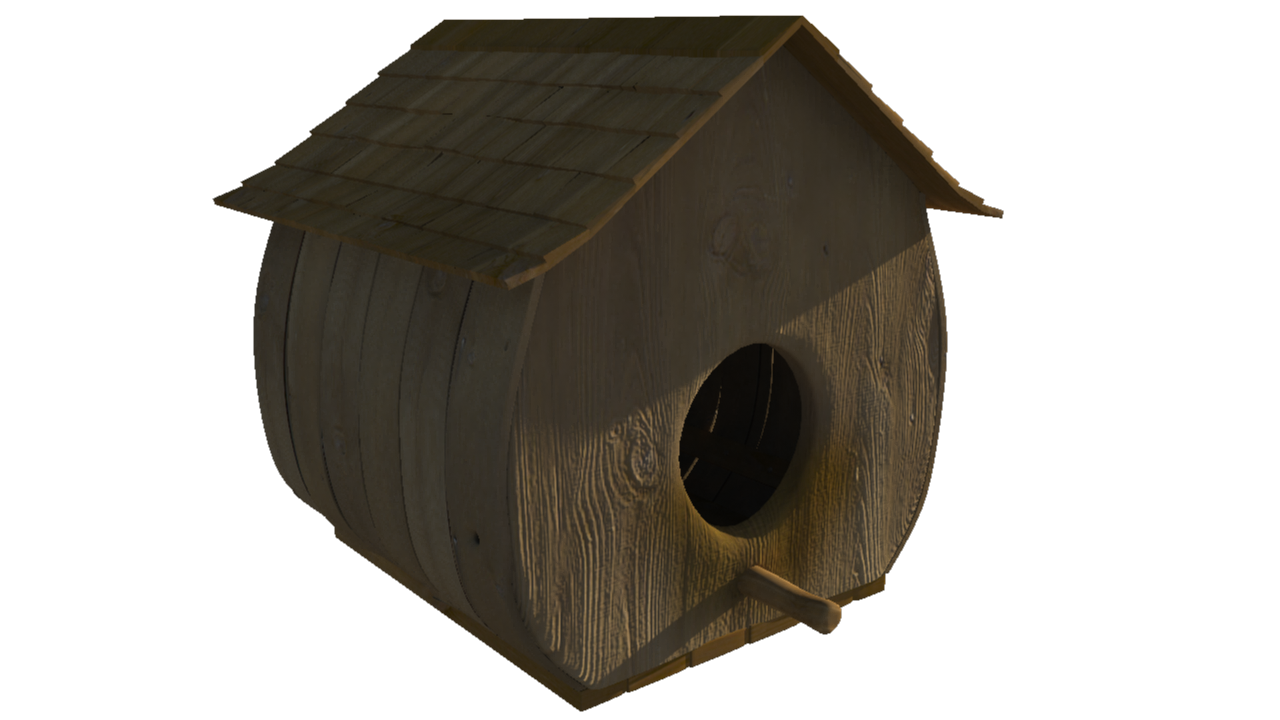
Thursday, 11 October 2012
Bird House/Nest
This is a quick example of the bird house. This was done in a few hours, which is a relief. I was hoping once I went to modelling less organic objects things would speed up and they have.

The main problem with this bird house at the minute is it looks to perfect. In order for this to look more realistic I will apply some randomised damage, wear and tear and texturing to make it look older and lived in. Some of this damage will be to make the bird house look more realistic but also to allow light to get in. A few warped panels and missing shingles should allow for the internal scene to have more realistic lighting.
The main problem with this bird house at the minute is it looks to perfect. In order for this to look more realistic I will apply some randomised damage, wear and tear and texturing to make it look older and lived in. Some of this damage will be to make the bird house look more realistic but also to allow light to get in. A few warped panels and missing shingles should allow for the internal scene to have more realistic lighting.
Tuesday, 9 October 2012
Storyboard
I have story boarded the idea out again, this is the 4th or 5th time now and each time positive changes have happened. I'm sure the foundation of the story is finished now.
Below is the most up to date storyboard:


Below is the most up to date storyboard:
I have included the storyboard below so the incremental changes can be seen
Monday, 8 October 2012
Rigging complete
The rigging of the magpie is now complete.
The bird has numerous movements:
- It has a breath function, this will add a realism and emotion to the bird
- Wings open and close, this was the hardest aspect of designing the bird
- Full head, tail and leg movement
- Blink and beak open/close
- claws can open, close and dangle when flying
The movements are a mixture of blendshapes, set driven keys and manual controls.
Below is a test animation showing the movement of the bird, the rig has been refined again after this render to remove the few mistakes.
Below is the skeleton of the bird

When painting weights on the bird i realised that weights are essentially moved around when painting. If the are removed from a joint then they will be moved to another joint. For this reason I found it best to paint weights at around 0.5 - 0.7 as painting weights at 1 often gave a rigid bend and made the weights jump around to much. In addition to this I learnt not to remove weights but instead add them. For example if I wanted to decrease a weight on "joint 2" i realised that painting more onto "joint 1" and "joint 3" would remove the weight from "joint 2". This method of "pushing" the weights around a model proved to be a much quicker way of painting weights. When i was happy with how a joint performed locking the joint kept the weights from changing, when using this method I always worked from the root joint outwards as this is the way Maya calculates the weights.
The bird is completed now, all that remains is to experiment with fur a little more in the attempt to get more realistic feathers on the body. The bird will be duplicated and slightly modified so it can be used for the female bird, i'll make the eyes bigger, change the colour of the beak slightly and change the wing colours slightly. The changes are to make the bird look different so the viewer does not get confused and to make the bird look more female. I am undecided as to whether the baby bird will be seen or just heard yet, if it will be seen a similar process will be followed to produce the baby bird. The fur will also be modified to make the baby bird more fluffy.
Subscribe to:
Comments (Atom)